marketing
How to Automatically Generate MailChimp Campaigns Using Google Sheet
How to Automatically Generate MailChimp Campaigns Using Google Sheet
If you need to send a lot of emails using MailChimp, then this post is exactly for you.
I built an app that requires me to send a lot of emails every month. This app is TVPremiereAlert where I send personalized alerts to TV show fans on the premiere day of their favorite TV shows.
I got tired of copying and pasting templates and manually editing the MailChimp campaign emails one by one.
It takes a lot of time, and there is a great chance for error, and it just kills my soul. It was always a task on my to-do list that was postponed until the last minute.
But, this is over!
In this post, I will show you how to automatically generate Mailchimp campaigns with the help of Google Sheet and Zapier. I will also show you how to generate customized share buttons for every campaign.
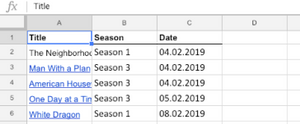
Step 1: Set Up Your Spreadsheet on Google Drive
Google Sheet helps to structure data you want to use in your campaigns.
Columns represent the different values you want to insert, and the title should be a general name for the data stored in that column. Check out my Excel sheet below.
Step 2: Sign Up for Mailchimp
If you don’t have a MailChimp account, then sign up first. If you have one, then there is nothing to do here; just proceed to the next step.
Step 3: Sign Up for Zapier
Go to Zapier.com and sign up for an account.
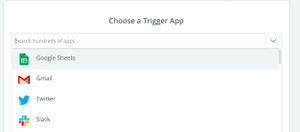
Step 4: Connect Google Sheet on Zapier
Let the fun begin!
1. Hit the “Make a Zap” button in the upper right corner.
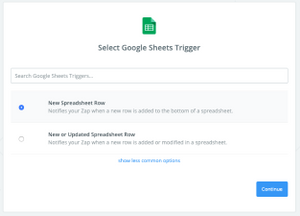
3. Select “New Spreadsheet Row” and click Continue.
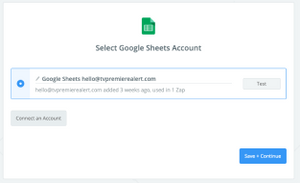
4. Connect the account where your spreadsheet is saved.
After that, make sure to test the connection. Finished? Click “Save + Continue.”
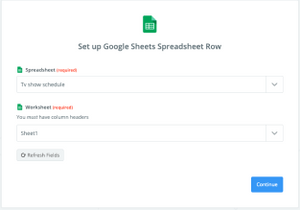
5. Select the spreadsheet from the list and set “Sheet1” for Worksheet. Looks good? Onward!
6. If you have any data in your spreadsheet, Zapier will suggest setting up a sample to test the connection. Select a row and hit continue.
You should see something like this:

Step 5. Set Up MailChimp in Zapier
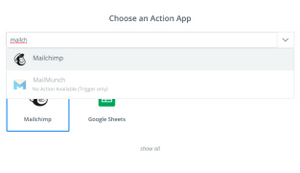
1. Select MailChimp from the list.
2. From the MailChimp action list, select “Create Campaign.” Then click continue.
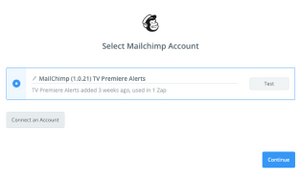
3. Connect your MailChimp account and test if everything went well.
4. We need to set up the MailChimp campaign template here since Zapier will generate it based on the data from your selected Google Sheet.
Here is how to do it.
- Generate unique names for every campaign:
If you take a look at your Sheet’s column titles and go back to Zapier, you will see exactly the same column titles listed here. 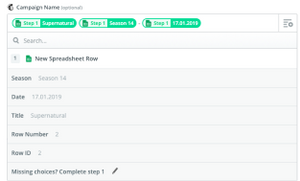
For me, the campaign name should be unique, so I inserted some variables here; they are <Title> <Season> - <Date>, but you can also insert text between the variables.
- Fill in the required fields
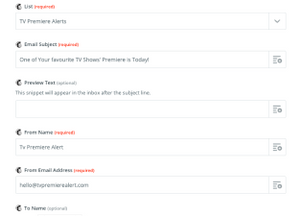
- Write your email content (in HTML)
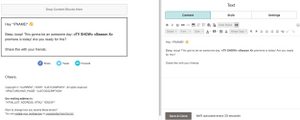
Let’s go back to MailChimp and create a campaign.
- Go to Templates and create a new one.
- This should look like this
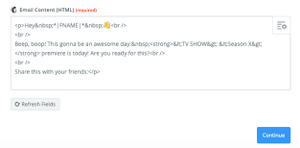
- Get the HTML code of the template
Click the small <> icon to toggle the HTML view.
- Get the HTML code of the share buttons (optional)
It’s pretty effective to embed share buttons in your emails, so your subscribers can easily share your stuff with their friends.
- Go to Addthis.com and register a free account.
- Generate share buttons
Visit this page, fill in the fields and select the social share buttons you want to add to your email campaigns.

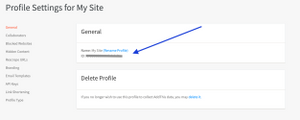
To find your profile ID, go to your Addthis account and click “Profile Settings.” Under the general menu, you will see your account’s ID; copy it and paste to the “Profile ID” field.
- Click “Generate Code,” and the HTML code of the share buttons will magically appear below.
- Paste the HTML codes to the email content field.
Go to Zapier, and paste the MailChimp template’s HTML code here:
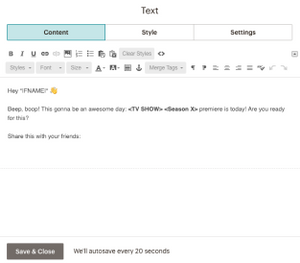
Then copy the HTML code of the Share buttons and paste them as well. 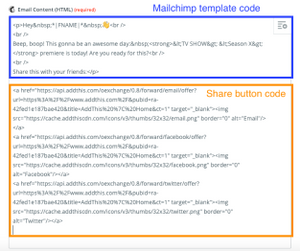 5. Customize the code!
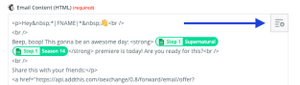
You can customize the email text for every campaign by adding the appropriate variables from your Google Sheet. The best thing? You can customize the text and even the link of every share button. Here is how to do it.
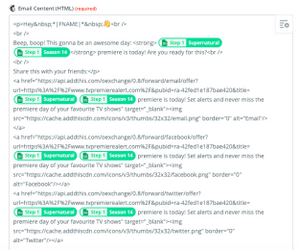
You simply replace the words you want to be different for every campaign with the data title of your columns from Google Sheet. The words I replaced are the green tags in the code.
You can see your options by clicking on the plus button on the upper right corner of the form field.
6. Test and publish your ZAP!
Everything is set? Test your Zap and check if the campaign looks great.
If everything is ok, switch your Zap to live!
From now on, if you add a new row to the selected Google Sheet, then Zapier will automatically generate a new campaign in MailChimp.
You can find these campaigns in MailChimp, under the Campaigns menu, in the Drafts.
The downside is that you still need to manually schedule or publish these campaigns. Also, if you want to target a specific segment, then you need to do that manually. But still, this automation saves a lot of time.
If you have any questions just let me know, I’m happy to help.
Comments